


In the episode of Yoto Daily for 24th September 2026, we meet Lynda White who describes making a flying bird puppet.
If you missed this episode, you can find the Yoto Daily archives in the Yoto App under Discover > Podcasts for Kids.
If your kids would like to make their own flying bird puppet, here are Lynda's instructions, and a template to print out at the bottom.
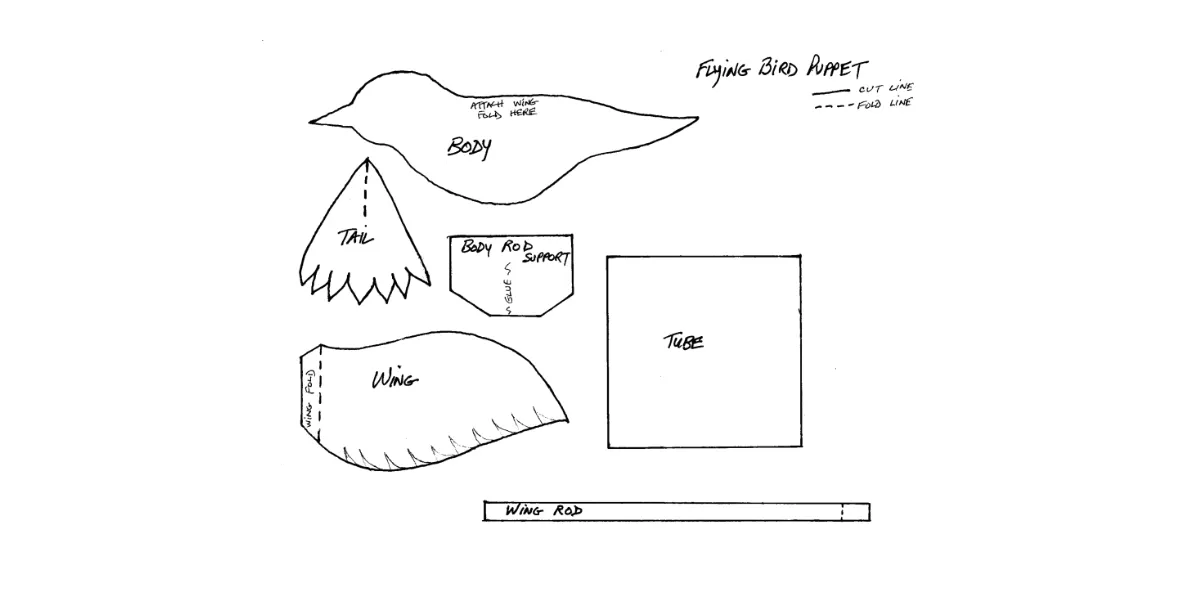
A preview of the Flying Bird Template
A pencil or some other "BODY ROD" like a chopstick or small dowel
Printer paper
Thin cardstock, like index cards
Scissors
Glue
Markers, crayons or paint (optional, for color)
Pieces to cut out in paper:
1 TAIL
1 square for making the TUBE
Pieces to cut out in thin cardstock:
2 BODY pieces
2 WINGS
2 WING RODS
2 BODY ROD SUPPORT pieces
TUBE
1. Roll the square of paper around the pencil and glue it closed. It should be loose enough to slide up and down the length of the pencil, but not too loose. Set aside until the glue is dry.
WING RODS
2. Line up the wing rods with the bottom of the TUBE and glue them to opposite sides of the tube. Following the dotted lines, make a little fold at the ends of each wing rod. This little folded part will be glued to the underside of the wings later. Set this assembly aside until the glue is dry.
BODY ROD SUPPORT
3. Glue the pencil in between the 2 pieces of BODY ROD SUPPORTs so it looks like the capital letter "T" with the pencil sticking out the bottom with the angled cut sides. Set aside until the glue is dry.
BODY
4. Glue one side of the body to the BODY ROD SUPPORT card. Flip it over and put glue on the other side of the BODY ROD SUPPORT card, and on the inside of the beak, the head and the tail. Line up the second body piece with the first body piece and stick it down. Set aside until the glue is dry.
WINGS
5. While not necessary, cutting feather shapes into the back edges of the wings is a fun option and is best to do before glueing to the body. Fold along the dotted line on the bottom edge of the wing. Glue the small folded-over section to the top edge of the bird's back. Flip it over to the other side, line up the second wing with the first and glue its folded over section to the bird's back..
Attaching WING RODS to WINGS
6. Position the wings so that they are pointing up, away from the bird's belly. Making sure the WING RODS don't get bent, slide the tube all the way up the pencil until it touches the bottom of the body. Then stick just the little folded ends of the WING RODS to the WINGS, one at a time, letting the glue dry each time. Be careful the glue doesn't spread further down the WING RODS or your bird won't fly. Wait until the glue is fully dried on both WINGS.
Once the glue has dried, when you slide the tube up and down the pencil the wings should flap.
TAIL
7. Pinch the pointy end of the tail along the dotted line, only about halfway down to the cut feather edge - don't fold the whole tail in half. Put some glue either side of the bird's body at the tail end. Pinch the tail onto the end of the body to make it stick.
NOW YOUR BIRD IS READY TO FLY!
Instructions and template